
| 일 | 월 | 화 | 수 | 목 | 금 | 토 |
|---|---|---|---|---|---|---|
| 1 | 2 | 3 | 4 | |||
| 5 | 6 | 7 | 8 | 9 | 10 | 11 |
| 12 | 13 | 14 | 15 | 16 | 17 | 18 |
| 19 | 20 | 21 | 22 | 23 | 24 | 25 |
| 26 | 27 | 28 | 29 | 30 |
- 객체
- 라라벨 팩토리
- laravel docker
- 라라벨 시더
- laravel migration
- 황반석 옮김
- php artisan
- laravel faker
- Docker
- 핵심만 골라 배우는 SwiftUI 기반의 iOS 프로그래밍
- 기획자랑 사이좋게 지내고 싶다
- 생활코딩
- php laravel
- 자바스크립트 배열 할당
- laravel seeder
- 자바스크립트
- laravel migrate 오류
- 자바스크립트 객체 만들기
- laravel 공부
- laravel sail
- 배열 분해 할당
- 닐 스미스 지음
- 라라벨 파커
- mysql
- artisan migrate
- 객체지향
- laravel factory
- Laravel
- 자바스크립트 객체
- 제이펍 출판
- Today
- Total
java,javascript,android,php,sql,공부용,메모용
안드로이드 화면 전환, 레이아웃 인플레이션 / Android Studio / 안드로이드 앱만들기 공부 19 본문
github.com/young-0112/SampleLayoutInflater
XML레이아웃 인플레이션
- XML 레이아웃의 내용이 메모리에 객체화되는 과정
- 레이아웃 정의/XML파일 --실행--> 메모리 로딩 ----> 화면(뷰그룹)
- XML 레이아웃은 앱이 실행되는 시점에서 메모리에 객체화된다
ex) 객체화가 되지 않은 버튼을 참조하려고 할때
...
public class MainActivity extends AppCompatActivity {
    @Override
    protected void onCreate(Bundle savedInstanceState) {
        super.onCreate(savedInstanceState);
        // setContentView(R.layout.activity_main);
	Button button = findViewById(R.id.button);
	button.setOnClickListener(new View.OnClickListener() {
		@Override
		public void onClick(View v) {
			Toast.makeText(getApplicationContext(),"버튼이 눌렸어요",Toast.LENGTH_LONG).show();
		}
	});
        // 객체화를 실행하는 setContentView()가 아래 있다
        // 객체화가 되기 전에 Button 객체를 참조하려고 하면 오류가난다
        setContentView(R.layout.activity_main);
    }
위 코드는 오류가 발생한다 오류로그에 NullPointerException 널 포인트 예외가 발생한다.
- setContentView() 메서드
1)화면에 나타내는 뷰를 지정한다
public void setContentView(int layoutReslD)
2)레이아웃 내용을 객체화 한다.
public void setContentView (View view [, ViewGroup.LayoutParams params])
부분화면 XML
- 부분화면도 XML레이아웃 파일에 정의한 후 불러와 보여줄수있다
- setContentView() 메서드는 액티비티의 메인레이아웃을 설정하는 것만 한다.
- 부분 화면을 메모리에 객체화 하려면 인플레이터를 사용해야한다.
- LayoutInflater는 시스템 서비스 클래스다
시스템서비스 클래스 : 단말이 시작되면서 항상 실행되는 서비스
- getSystemService() 메서드를 이용해 LayoutInflater 객체를 참조한 후 사용
getSystemService(Context.LAYOUT_INFLATER_SERVICE)
새화면 추가하기
1. SampleLayoutInflater 프로젝트 생성
2. app폴더 - NEW - Activite - Empty Activity

3. Activity Name : MenuActivity 라고 입력 후 생성
- res/layout 폴더에 XML레이아웃 파일과 app/java 폴더에 새로운 자바 소스코드 파일이 만들어짐

activity_menu.xml 화면을 아래 사진처럼 만든다.
(코드작성 디자인툴 활용 나는 디자인툴이 빠르고 편해서 디자인툴로했다)

검색해서 공부하러 온분이라면 위 그림보고 만들어보고 아래 접기 눌러서 코드확인하기
<?xml version="1.0" encoding="utf-8"?>
<LinearLayout xmlns:android="http://schemas.android.com/apk/res/android"
    xmlns:app="http://schemas.android.com/apk/res-auto"
    xmlns:tools="http://schemas.android.com/tools"
    android:layout_width="match_parent"
    android:layout_height="match_parent"
    android:orientation="vertical"
    tools:context=".MenuActivity">

    <TextView
        android:id="@+id/textView"
        android:layout_width="match_parent"
        android:layout_height="wrap_content"
        android:text="버튼을 눌러 화면을 추가하세요"
        android:textSize="18sp" />

    <Button
        android:id="@+id/button"
        android:layout_width="match_parent"
        android:layout_height="wrap_content"
        android:text="추가하기" />

    <LinearLayout
        android:id="@+id/container"
        android:layout_width="match_parent"
        android:layout_height="match_parent"
        android:orientation="vertical" />
</LinearLayout>
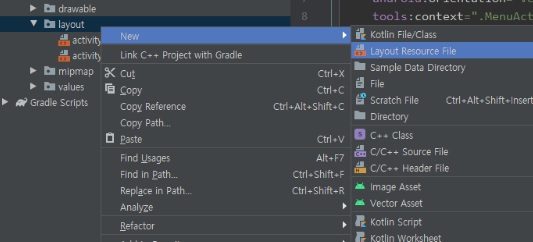
부분 화면에 추가할 XML레이아웃 만들기
1. /app/res/layout 폴더에 마우스오른쪽
2. New - Layout resource file
3. File name : sub1.xml
/app/res/layout/sub1.xml 코드작성

<?xml version="1.0" encoding="utf-8"?>
<LinearLayout xmlns:android="http://schemas.android.com/apk/res/android"
    android:orientation="vertical"
    android:layout_width="match_parent"
    android:layout_height="match_parent">


    <TextView
        android:id="@+id/textView"
        android:layout_width="match_parent"
        android:layout_height="wrap_content"
        android:text="부분 화면 1"
        android:textSize="30sp" />

    <CheckBox
        android:id="@+id/checkBox"
        android:layout_width="match_parent"
        android:layout_height="wrap_content"
        android:text="동의합니다" />
</LinearLayout>
전체 레이아웃에 부분 레이아웃 추가하기
1. activity_menu.xml 파일의 짝 MenuActivity.java 파일 수정
package com.togapp.samplelayoutinflater;

import androidx.appcompat.app.AppCompatActivity;

import android.content.Context;
import android.os.Bundle;
import android.view.LayoutInflater;
import android.view.View;
import android.widget.Button;
import android.widget.CheckBox;
import android.widget.LinearLayout;

public class MenuActivity extends AppCompatActivity {
    LinearLayout container;

    @Override
    protected void onCreate(Bundle savedInstanceState) {
        super.onCreate(savedInstanceState);
        setContentView(R.layout.activity_menu);

        // activity_menu.xml 안쪽에 리니어 레이아웃 id는 container
        container = findViewById(R.id.container);
        // activity_menu.xml container를 할당했으니 onclick 할때 변수 참조 가능
        Button button = findViewById(R.id.button);
        button.setOnClickListener(new View.OnClickListener() {
            @Override
            public void onClick(View view) {
                // getSystemService() 메서드로 LayoutInflater 객체를 참조
                LayoutInflater inflater = (LayoutInflater)
                        getSystemService(Context.LAYOUT_INFLATER_SERVICE);
                // sub1.xml 메모리에 객체화
                // inflate() 객체를 이용해서 파라미터로 R.layout.sub1, container를 전달
                inflater.inflate(R.layout.sub1, container, true);

                // sub1.xml이 객체화 되었으니 sub1.xml의 CheckBox를 참조할수있다
                // CheckBox는 sub1에 있지만 container에 객체로 설정되어있으니 container.findViewByID로 참조할수있다.
                CheckBox checkBox = container.findViewById(R.id.checkBox);
                checkBox.setText("로딩되었습니다.");
            }
        });

    }
기억하기
sub1.xml을 메모리에 객체화를 하고
inflate() 객체를 이용해서 파라미터로 R.Layout.sub1, container를 전달한다
- inflate()메서드
View inflate(int resource, ViewGroup root)
첫번째 파라미터로 XML 레이아웃 리소스 지정
두번째 파라미터로 부모 컨테이너를 지정
- LayoutInflater 객체는 시스템 서비스로 제공되므로 getSystemService() 메서드를 호출하거나
LayoutInflater 클래스의 from() 메서드를 호출해 참조할수있다.
static LayoutInflater LayoutInflater.from(Context context)
** 인플레이션 : 앱이 실행될때 레이아웃 XML파일에 정의된 내용들이 메모리에 객체화 된다
매니페스트 app/manifests/AndroidManifests.xml
첫 화면이 activity_menu.xml 이니 코드수정
<?xml version="1.0" encoding="utf-8"?>
<manifest xmlns:android="http://schemas.android.com/apk/res/android"
    package="com.togapp.samplelayoutinflater">

    <application
        android:allowBackup="true"
        android:icon="@mipmap/ic_launcher"
        android:label="@string/app_name"
        android:roundIcon="@mipmap/ic_launcher_round"
        android:supportsRtl="true"
        android:theme="@style/AppTheme">
        <activity android:name=".MainActivity"></activity>
        <activity android:name=".MenuActivity">
            <intent-filter>
                <action android:name="android.intent.action.MAIN" />

                <category android:name="android.intent.category.LAUNCHER" />
            </intent-filter>
        </activity>
    </application>

</manifest>
<activity android:name=".MainActivity"></activity>
<activity android:name=".MenuActivity">
<intent-filter>
<action android:name="android.intent.action.MAIN" />
<category android:name="android.intent.category.LAUNCHER" />
</intent-filter>
</activity>
 |
 |
전체과정 메모
1) 화면a, 부분화면b xml을 작성하고
2) java 코드에서
1. LinearLayout container; 변수를 지정하고
container = findViewById(R.id.container); 어떤 곳에있는지 찾아서 참조를하고
2. 부분레이아웃을 LayoutInflater 클래스의 getSystemService()로 LayoutInflater 객체를 참조하고
3. inflate(부분화면b를 지정, 부모화면a지정) 메서드의 파라미터로 전달한다.
3) 매니페스트 manifests 안에 activity 태그의 android:name 값 변경


